
Tutorial: A Course Curriculum
Planning a course means juggling a schedule, readings, assignments, and — over time — a record of what worked. DocuShark keeps all of it in one document: the plan, the reading PDFs, a map of how the units connect, and a snapshot you can archive each term. This walkthrough builds an Intro to Astronomy course plan.
What you'll build: a course plan document — a weekly schedule, readings embedded as files, a citable reading list, a course concept-map, and a canvas showcase of exemplary student work.
You'll learn: tables, embedded files as readings, citations, a linked concept diagram, archiving a document as .docushark, and organizing with collections.
Before you start: open DocuShark.
Want the finished version?
Download this course plan as a .docushark and import it to explore the end result, or browse them all in the Example Gallery.
1. Start the plan
Click New and name it Intro to Astronomy — Course Plan. Add document fields for Course, Term, and Instructor so the header stays consistent and you can clone the plan next term by just changing the values. See Document Fields.
2. Lay out the schedule
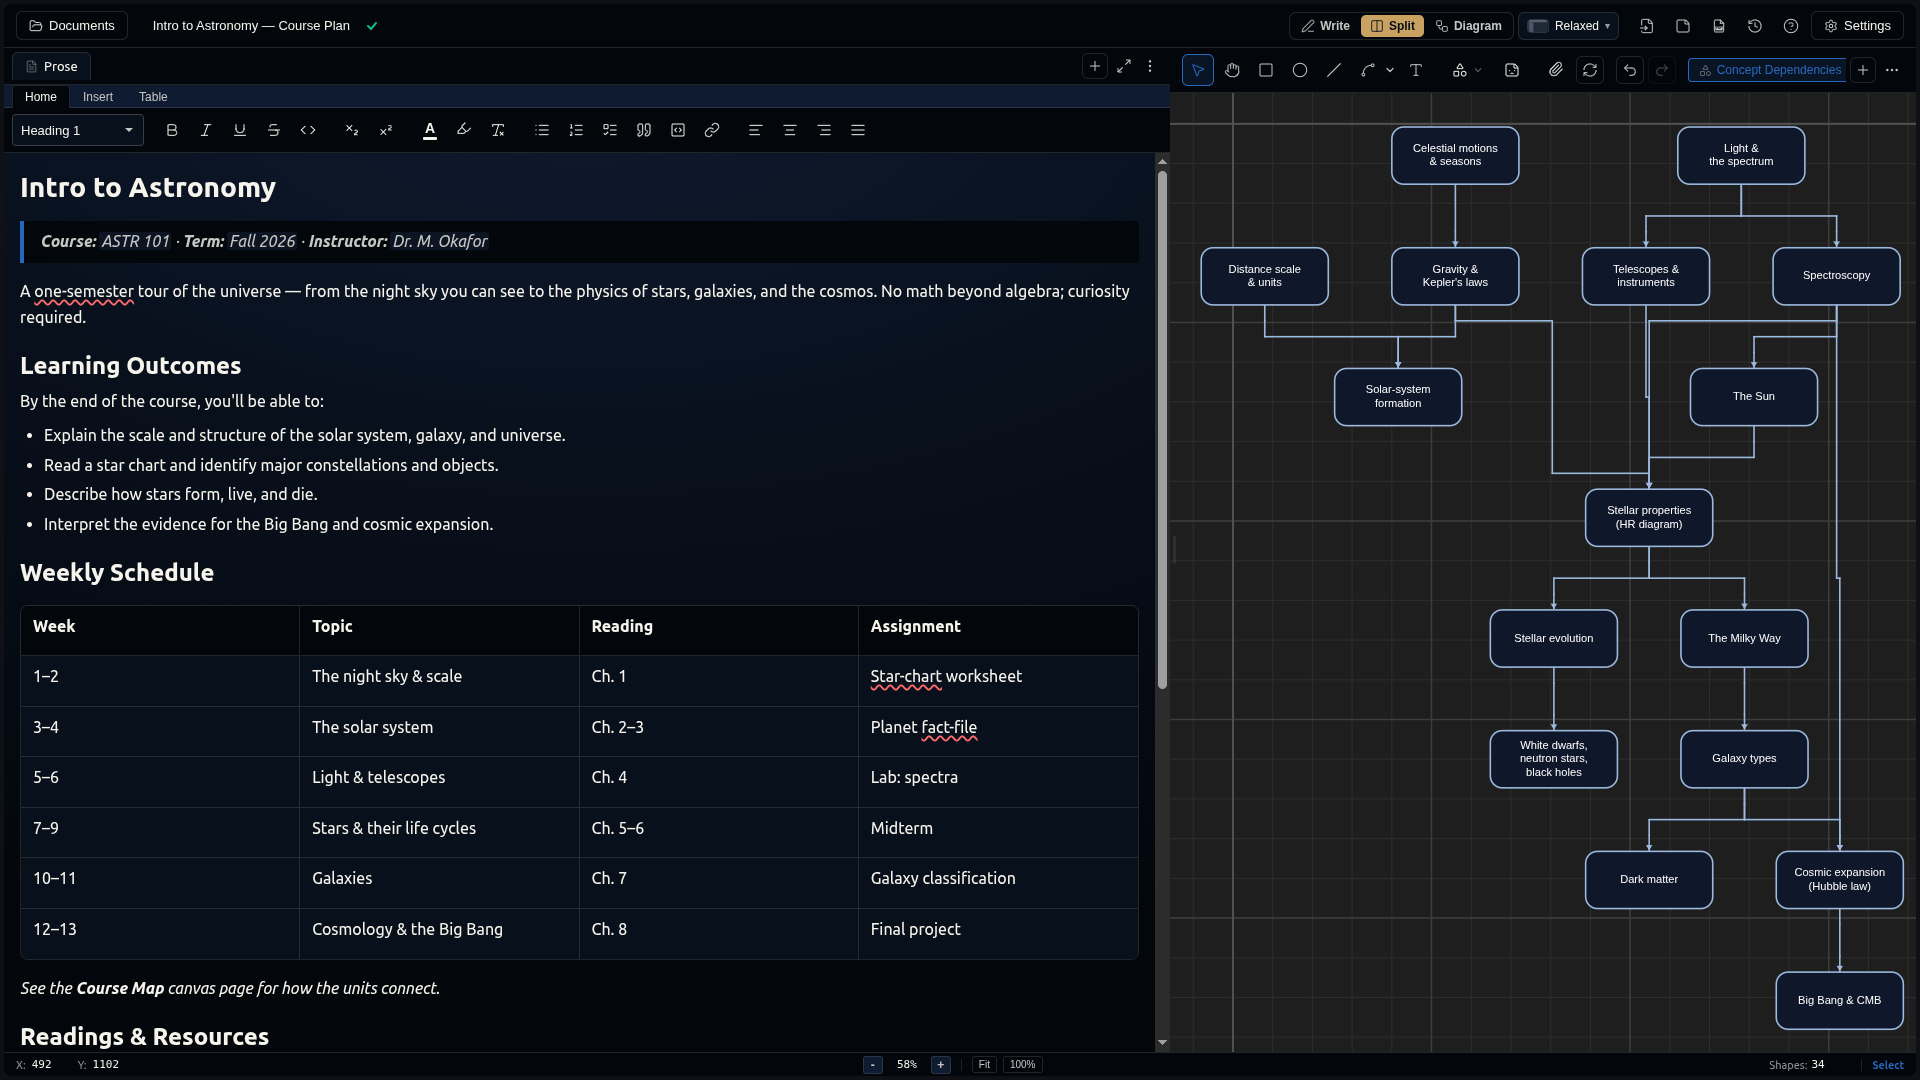
Write your learning outcomes as a list, then build the weekly schedule as a table — one row per week, columns for Topic, Reading, and Assignment:
| Week | Topic | Reading | Assignment |
|---|---|---|---|
| 1–2 | The night sky & scale | Ch. 1 | Star-chart worksheet |
| 3–4 | The solar system | Ch. 2–3 | Planet fact-file |
Tables are first-class in the editor — see Rich Text & Notes.
3. Attach the readings as files
Keep the actual readings in the plan so students open everything from one place. Drag each PDF onto the canvas — it becomes a file card with a preview thumbnail. Lab handouts, slide decks, and datasets work the same way. See Embedded Files.
4. Cite the set texts
For the course's set texts and papers, use the reference library rather than a hand-typed list: add each book or article (a DOI fills the details), then drop inline citations into your Readings section. The bibliography generates itself. See Citations & References.
5. Map how the units connect
Add a second canvas page named Course Map and diagram the arc — Foundations → Solar System → Stars → Galaxies → Cosmology — with connectors (C) showing prerequisites. Reference it from your prose ("See the Course Map for how the units connect") so students get the big picture. See Multi-Page Documents.
6. Showcase exemplary student work
Pin standout student projects — a star-chart annotation, a galaxy-classification poster — to a Showcase area of the canvas, and highlight them for next term's class. Everything lives beside the plan it belongs to.
7. Archive each term
At the end of the semester, export the plan as a .docushark archive — a single file that bundles the prose, the diagrams, and every embedded reading. Keep one per cohort so the course history stays intact and importable later, on web or desktop. See Export & Import.
Group your per-term plans into a collection so your whole teaching history is one tidy shelf. See Collections & Tags.
8. Available on every device
Your plan syncs to your workspace — pull it up in the lecture hall, at home, or on your phone, and mark it available offline for a no-signal classroom.
What you learned
You built a course plan that holds its own schedule, readings, concept-map, and student showcase — citable, archivable per term, and synced everywhere.
Next steps
- Tutorial: A Content Creator's Plan — topic maps and a production pipeline.
- Embedded Files — everything about files on the canvas.
- Collections & Tags — organize a term-by-term library.